You are using an out of date browser. It may not display this or other websites correctly.
You should upgrade or use an alternative browser.
You should upgrade or use an alternative browser.
08 EZGO TXT build
- Thread starter 5Cent
- Start date
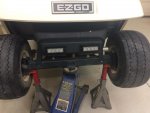
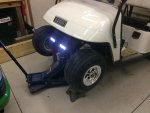
Slow moving since getting back to the work grind after kid #3 time off. Found a wiring harness on amazon that had relay, 40A fuse and switch included for $8.99. Got it run loosely and mounted the two 5" models on the bottom.


This and an insurance policy gets me legal for the campground for after dark use, mostly. Supposed to have rear markers, not sure if they have to be working brake lights or not but come on.
The light bar made from the treestand got a smooth grinding to be ready to attach under the windshield. No pictures, daddy duty called.
Sweet stuff Adam. You gonna put a pussy magnet sticker on it? Or one that says "I brake for tittys"
Or "Cowboys Butts Drive Me Nuts" LOL
The extra 12v was installed on the driver side. There is a nice open area just besides the large battery tray that holds the 6v bank, right behind where the charger connects. The LEDs are just too bright for close quarter use. I decided that I really liked the way the fitted kind look and I needed a proven option. I ordered a kit from RecPro off Amazon. Fronts are halogen and rears are LED. Only had time to run the harness and install the fronts. Will get to install the back sometime this summer or if it becomes an issue that I have no rear lights.
Install was pretty straight forward. Using a paper template, mark your cutouts. Step back to measure and take a look. I should have done a little better job as the RH one is more towards the center, but it works.

First I drilled holes in the corners for relief. Then used a dremel and a 4.5" grinder with a cutting wheel. Use a mask, safety glasses, long sleeves and pants, and a respirator/towel to manage the fiberglass shards and dust. Hold your nuts and start cutting, once you commit, no turning back!
The light bezels had decent overlap but I had to keep checking the fit. Once where I wanted them mark then I marked where to drill the screws. Drill, then attach with provided screws.

Overall the install was relatively easy. The kit came with a prewired harness and a pullout switch. I ran all of it to its home and installed the switch then connected the fronts and tada.

Install was pretty straight forward. Using a paper template, mark your cutouts. Step back to measure and take a look. I should have done a little better job as the RH one is more towards the center, but it works.

First I drilled holes in the corners for relief. Then used a dremel and a 4.5" grinder with a cutting wheel. Use a mask, safety glasses, long sleeves and pants, and a respirator/towel to manage the fiberglass shards and dust. Hold your nuts and start cutting, once you commit, no turning back!
The light bezels had decent overlap but I had to keep checking the fit. Once where I wanted them mark then I marked where to drill the screws. Drill, then attach with provided screws.

Overall the install was relatively easy. The kit came with a prewired harness and a pullout switch. I ran all of it to its home and installed the switch then connected the fronts and tada.

Last edited:
It's coming along, just have to get the necessities finished before anything else. The cart has been sitting outside all week at the site, uncovered. Hoping all is OK with it when I get there tonight. Something about electricity and water worries me even though they are built for it. I made sure the cover is in the truck.
Next step is to figure out where it will live when it's parked and get the area defined. My head is taking me to 4 pads under each tire, using concrete pavers.
There are some really nice custom carts at the campground, will snap some pictures to put in here so I can reference later and to keep readers engaged on how far people take these things. I have 0 creativity in my body, can only reverse engineer/steal ideas. No way I am dumping the $ into it like some that have to be approaching the cost of a vehicle.
loose_is_fast
Junior Member
We bought a 10 x10 tent shed for our golf cart for at the campground. It is at the back of our camper so when I pull in i run a chain around the bumper of the camper and around the spindle of the golf cart and then lock it. Out of sight out of mind. Keeps it out of the elements and don't have to worry about it being stolen without some work.
We bought a 10 x10 tent shed for our golf cart for at the campground. It is at the back of our camper so when I pull in i run a chain around the bumper of the camper and around the spindle of the golf cart and then lock it. Out of sight out of mind. Keeps it out of the elements and don't have to worry about it being stolen without some work.
That's perfect, loose. Unfortunately we have to have our firewood behind our camper and our site is not that deep.
Almost at the mid-point for summer and the cart is still living a good life! It gets uncovered when we arrive, charged at least 1x over night during a typical 2-day weekend, and covered when we leave. The batteries needed topped off once so far and are holding a charge very well. I am having an issue with corrosion on the positive post of the 10yr old Diehard 12v standalone so sometimes the lights go out after hitting a bump lol. A quick stop to loosen and retighten the wing nut just keeps things more interesting. Need to get it cleaned/lubed up.
Buckmaster
Senior Member
I used to work for Textron prior to leaving them in 2008 to start our own gig. We used to furnish EZGO all their fasteners to put those things together.
Cart is still holding up/running well since the update 2 months ago. It got a real workout at BG tractor pulls with the rain Saturday night. I quickly realized I was glad I didn't drop any coin on lifting and installing bigger tires. The little stock setup plowed through 6" slop when the lifted, aggressive tires were digging and getting stuck lol.
She's all cleaned up and back at the camp site for the season end on Nov 1. Wife and I have agreed to not due seasonal camping again, so...
She's 4 Sale:smiley_clap:
She's all cleaned up and back at the camp site for the season end on Nov 1. Wife and I have agreed to not due seasonal camping again, so...
She's 4 Sale:smiley_clap:

