With almost no flat land on the farm and needing an attractant up on the limited ridges on the farm I selected an area that met the goals outlined below. Everyone should know the issues of thermals and swirling winds in bowls and valleys so I'll leave that one alone for now: Which is why this plot is 'on-top'. This ridge is a decent cruising location during the rut but there wasn't anything 'holding' the does around there as it was mature canopy. Watching the behavoir around plots for the last two years I knew if I could get a plot on that ridge and not spook he does off during the afternoon feeding, it will be a killer draw. It's aligned N-S with ponds that bottleneck deer movement.

I looked into a dozer to shove trees over and move ground around but to access it via the existing bike path the clearance was only 6' wide, I'd have to widen 250 yards of trail to get equipment there, loose a bunch of trees and time, added costs and huge topsoil disturbance. Also no way to get the AGlime spreader there - it's 11' wide. So for two years I thought on how to do this with these goals:
I setup a Browning Dark Ops (my goto gamecam) to record the plot going in. Basically it's in this order:
Spoil Food Plot First Cut to final lime
I'll be adding to this thread as well as this plot gets established. Here are a couple other snaps for reference.
Spoil Plot Marked out with Yellow Tape.

Spoil Plot mid way - And me thinking what the F%K WAS I THINKING... but smiling the whole time.

Spoil Plot Finished

Total costs;

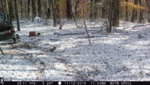
South end of Spoil Stand 45 days after cut.

Spoil Plot design/size (light green box in the pic) was done on Google Earth Pro (Free) using the Polygon feature.
I looked into a dozer to shove trees over and move ground around but to access it via the existing bike path the clearance was only 6' wide, I'd have to widen 250 yards of trail to get equipment there, loose a bunch of trees and time, added costs and huge topsoil disturbance. Also no way to get the AGlime spreader there - it's 11' wide. So for two years I thought on how to do this with these goals:
- Installed in 2-3 total days
- 1/4 - 1/3 acre
- Maintainable / access by bike, Mowing, Seeding, Lime (pelletized), Spraying
- Not disturb the loam, very little topsoil that exists ontop that 70 year old strip mining spoil bank
I setup a Browning Dark Ops (my goto gamecam) to record the plot going in. Basically it's in this order:
- Fell trees (experience will tell you how many before you need to do step two)
- Delimb and bunk the trunks - repeat step one until done felling trees
- Get the limbs and trunk bunks out of the plot
- Get the stumps out (I went with a grinder instead of plow or dozer) on the plot
- Seed
- Lime (I know the ridge is hot based on the forest and being a strip spoil bank. Max application by agronomists is 2 Ton / acre per application)
Spoil Food Plot First Cut to final lime
I'll be adding to this thread as well as this plot gets established. Here are a couple other snaps for reference.
Spoil Plot Marked out with Yellow Tape.
Spoil Plot mid way - And me thinking what the F%K WAS I THINKING... but smiling the whole time.
Spoil Plot Finished
Total costs;
- 1 chain saw blade ($22)
- Weekend rental mid-grade stump grinder ($270)
- 1,000# Lime (25 bags) ($80)
- Seed ($50)
- Beer for the two buddies and myself (OUCH!!)
- Bagging my buck that November while he was on that ridge, headed to check that plot? Pic of the bear in the plot and other bucks cruising it - Priceless!
South end of Spoil Stand 45 days after cut.
Last edited: