You are using an out of date browser. It may not display this or other websites correctly.
You should upgrade or use an alternative browser.
You should upgrade or use an alternative browser.
Been busy in the shop
- Thread starter Jamie
- Start date
finally got the shop straightened up a bit and got some bow work done. I had a fellow from Tennessee contact me about selling him a bow blank back in October, which turned into me selling him a "u-finish" bow that I'll tiller for him. he'll finish sand, seal it up with something, put a leather handle on it, etc. I told him I wouldn't be in the shop until the end of January after I was done hunting. no promises on delivery time, so I'll get it done and see if he still wants it. I'll be surprised if he actually still does, but who knows? I think I glued up these three bow blanks two years ago. maybe last spring. I don't remember. all three of these blanks are halfway done, really. the one in the vise is going down the road. the other two will be lighter weight bows for my sorry old ass.

I pretty much just did all of the heavy rasp work, cleaning up the glue and rounding off corners and such, which a needs to be done before you start doing any real serious bending. I'm floor tillering along the way, too. to get a feel for where I am weight-wise and see how the limbs are beginning to bend. I shaped the handle and took a little stock off the belly, mostly on the lower limb which is shorter, and was a noticeable stiffer than the upper limb. tomorrow I'll cut the string grooves and brace it up for the first glimpse of the tiller and to check the weight at a very short draw length.
all three of these looked the same when I started today. the one on the left is the one I worked on, obviously.


I don't know what's up with the color in these pics. terrible
I pretty much just did all of the heavy rasp work, cleaning up the glue and rounding off corners and such, which a needs to be done before you start doing any real serious bending. I'm floor tillering along the way, too. to get a feel for where I am weight-wise and see how the limbs are beginning to bend. I shaped the handle and took a little stock off the belly, mostly on the lower limb which is shorter, and was a noticeable stiffer than the upper limb. tomorrow I'll cut the string grooves and brace it up for the first glimpse of the tiller and to check the weight at a very short draw length.
all three of these looked the same when I started today. the one on the left is the one I worked on, obviously.
I don't know what's up with the color in these pics. terrible
- 25,777
- 276
Looking good old man. One of these gonna be 66” and about 45lbs?
OO2
Well-Known Member
Sgt Fury
Sgt. Spellchecker
Very impressive...that’s a skill that requires a lot of time..trial and error to perfect. Something that I’d really like to learn but I have no one close by with that knowledge and skill set. I build my own arrows (wooden, aluminum and carbon) but that’s easy to learn after watching someone do it. Must take many years to learn how to build a bow from scratch.finally got the shop straightened up a bit and got some bow work done. I had a fellow from Tennessee contact me about selling him a bow blank back in October, which turned into me selling him a "u-finish" bow that I'll tiller for him. he'll finish sand, seal it up with something, put a leather handle on it, etc. I told him I wouldn't be in the shop until the end of January after I was done hunting. no promises on delivery time, so I'll get it done and see if he still wants it. I'll be surprised if he actually still does, but who knows? I think I glued up these three bow blanks two years ago. maybe last spring. I don't remember. all three of these blanks are halfway done, really. the one in the vise is going down the road. the other two will be lighter weight bows for my sorry old ass.
View attachment 94227
I pretty much just did all of the heavy rasp work, cleaning up the glue and rounding off corners and such, which a needs to be done before you start doing any real serious bending. I'm floor tillering along the way, too. to get a feel for where I am weight-wise and see how the limbs are beginning to bend. I shaped the handle and took a little stock off the belly, mostly on the lower limb which is shorter, and was a noticeable stiffer than the upper limb. tomorrow I'll cut the string grooves and brace it up for the first glimpse of the tiller and to check the weight at a very short draw length.
all three of these looked the same when I started today. the one on the left is the one I worked on, obviously.
View attachment 94228
View attachment 94229
I don't know what's up with the color in these pics. terrible

Looking good old man. One of these gonna be 66” and about 45lbs?
two of them are 66"ers that are gonna be about 55lbs. maybe one that is 50 for the cold days. I have a BBO in my hotbox that is 99% done, but is only about 40lbs at 28". I may make a rabbit bow out of it.
Very impressive...that’s a skill that requires a lot of time..trial and error to perfect. Something that I’d really like to learn but I have no one close by with that knowledge and skill set. I build my own arrows (wooden, aluminum and carbon) but that’s easy to learn after watching someone do it. Must take many years to learn how to build a bow from scratch.
it's a labor of love, Sgt. I'm merely a student of the craft, although I took to the work like a moth to a flame. I've spent countless hours doing the work because I enjoy it and it is meaningful to me. I started with nothing more than just the desire to make a bow, just like you. the learning never stops when you are building wooden bows. you don't really need an instructor, but it probably helps a bunch to have a mentor. I was fortunate to take up company with one of the true masters. He's gone now, but his legacy lives on in me and scads of other aspiring bowyers that followed his methods.
you come to Ohio often. shop door is open. come and see me.
Watch what you wish for, Jamieit's a labor of love, Sgt. I'm merely a student of the craft, although I took to the work like a moth to a flame. I've spent countless hours doing the work because I enjoy it and it is meaningful to me. I started with nothing more than just the desire to make a bow, just like you. the learning never stops when you are building wooden bows. you don't really need an instructor, but it probably helps a bunch to have a mentor. I was fortunate to take up company with one of the true masters. He's gone now, but his legacy lives on in me and scads of other aspiring bowyers that followed his methods.
you come to Ohio often. shop door is open. come and see me.


I will say that every time I pull up this thread I get more and more amazed. Your workmanship looks amazing. I hope that I can get up your way sometime to see your work in person, shake your hand, and possibly soak up some of your knowledge.
I will continue to follow along.
I will continue to follow along.
filing the string grooves into the side of a bow limb probably seems like a completely safe and simple proposition to the layperson or casual observer. I mean, when was the last time you picked up a bow and scrutinized the string nocks?
if we only needed one, it would be much less of a concern, lol.") filing on each side of the limb at precisely the same angle, depth and equidistant from the end of the bow is another matter. for years I just eyeballed it as best I could, sometimes using a combination square to mark a 45* guide line. sometimes it worked great, sometimes not so perfect. you only get one shot to get this right, really. correcting any disparity between the opposing string grooves can be quite difficult, and the greater the difference, the worse the problem. leaving them unequal in any of the aforementioned ways can cause problems. I'm sure it's nearly impossible to understand some of the intricacies of wooden bow building unless you've actually done it, or tried to do it. they are innumerable, but this particular one, as seemingly insignificant as it is, can cause real problems if not done right.
filing on each side of the limb at precisely the same angle, depth and equidistant from the end of the bow is another matter. for years I just eyeballed it as best I could, sometimes using a combination square to mark a 45* guide line. sometimes it worked great, sometimes not so perfect. you only get one shot to get this right, really. correcting any disparity between the opposing string grooves can be quite difficult, and the greater the difference, the worse the problem. leaving them unequal in any of the aforementioned ways can cause problems. I'm sure it's nearly impossible to understand some of the intricacies of wooden bow building unless you've actually done it, or tried to do it. they are innumerable, but this particular one, as seemingly insignificant as it is, can cause real problems if not done right.
if one groove is deeper than the other, or if one groove's shoulder is higher than the other, it can cause the string to be misaligned with the center of the bow limb, which in turn causes a limb to twist. limbs torqueing while drawing a bow can cause unwanted vibration, noise, and stress on the working limb that is unnecessary, and if it is bad enough, eventually it could cause a wooden bow to break. it can also cause problems with arrow flight. it is extremely important to have the string tracking exactly down the middle of the limbs, and bisecting the handle. this becomes even more important with a static or working recurve. 8 or 10 years ago I got fed up with dealing with uneven string grooves and devised a jig for marking guide lines to use as reference when cutting the string grooves. I cut them in by hand with a tapered 1/8" rattail bastard. a chain saw file is miserable substitute, but most everyone uses them instead of buying the correct tool for the job because they are readily available everywhere, and cheap.


it's expandable to accommodate different with limb tips


this little jig has saved me a ton of time and aggravation. having guide lines that are exactly the same on both sides make this exercise much, much easier with more consistent results. I still have to control the depth of the grooves by eyeballing it, but that is pretty easy to do. Interestingly, the string grooves can be used to overcome small amounts of natural twist in a limb by filing one deeper than the other, and manipulating the string grooves is one way to fine tune the string alignment on selfbows with snakey limbs that are inherently crooked.
if we only needed one, it would be much less of a concern, lol.
filing on each side of the limb at precisely the same angle, depth and equidistant from the end of the bow is another matter. for years I just eyeballed it as best I could, sometimes using a combination square to mark a 45* guide line. sometimes it worked great, sometimes not so perfect. you only get one shot to get this right, really. correcting any disparity between the opposing string grooves can be quite difficult, and the greater the difference, the worse the problem. leaving them unequal in any of the aforementioned ways can cause problems. I'm sure it's nearly impossible to understand some of the intricacies of wooden bow building unless you've actually done it, or tried to do it. they are innumerable, but this particular one, as seemingly insignificant as it is, can cause real problems if not done right. if one groove is deeper than the other, or if one groove's shoulder is higher than the other, it can cause the string to be misaligned with the center of the bow limb, which in turn causes a limb to twist. limbs torqueing while drawing a bow can cause unwanted vibration, noise, and stress on the working limb that is unnecessary, and if it is bad enough, eventually it could cause a wooden bow to break. it can also cause problems with arrow flight. it is extremely important to have the string tracking exactly down the middle of the limbs, and bisecting the handle. this becomes even more important with a static or working recurve. 8 or 10 years ago I got fed up with dealing with uneven string grooves and devised a jig for marking guide lines to use as reference when cutting the string grooves. I cut them in by hand with a tapered 1/8" rattail bastard. a chain saw file is miserable substitute, but most everyone uses them instead of buying the correct tool for the job because they are readily available everywhere, and cheap.
it's expandable to accommodate different with limb tips
this little jig has saved me a ton of time and aggravation. having guide lines that are exactly the same on both sides make this exercise much, much easier with more consistent results. I still have to control the depth of the grooves by eyeballing it, but that is pretty easy to do. Interestingly, the string grooves can be used to overcome small amounts of natural twist in a limb by filing one deeper than the other, and manipulating the string grooves is one way to fine tune the string alignment on selfbows with snakey limbs that are inherently crooked.
I finally got Alberts bow done, and he even still wants it even though it came in about 4 lbs under weight. still shoots like a 55 lb bow even though it will be luck to make 50 by the time he does the finish sanding. Deflex/Reflex BBO's are just plain sexy. Albert got himself a real deal on this bow. as soon as I get the money, I'll pack it up to ship.


still shoots like a 55 lb bow even though it will be luck to make 50 by the time he does the finish sanding. Deflex/Reflex BBO's are just plain sexy. Albert got himself a real deal on this bow. as soon as I get the money, I'll pack it up to ship. I got Alberts' bow in the mail this week. he called me this morning to check the status of his "order". he was so excited when I told him it was supposed to arrive today he said that he was going to stay home all day waiting for it.  He's retired. I refer to him like we're old friends or something, but I've never met the man. He's actually from Oklahoma, not Tennessee like I thought. He was referred to me by my friend and mentor Dean Torges sometime before his passing back in 2015 0r 2016. I remember Albert contacting me about making him a bow back then, but he didn't have the money or I didn't have time or something. hope he likes it. I just now got around to shooting the bow I'm making for myself for the first time. 66" 50lbs @ 28.5", which is 5lbs less than I was planning. also, this is the first bow I've brought to the shooting stage that is backed with an experimental timber bamboo specie called Blue Henon, grown in Mississippi, harvested by a friend of mine who asked me to try it. I really hate it when they come in under weight enough that it matters. 1 or 2 lbs does not really matter much in terms of cast for hunting/shooting at close range. 5lbs does matter. in all actuality, bow weight only matters in terms of being able to shoot desirable weight arrows. in that sense, I make bows for myself to match my arrows, not the other way around, but that is whole other topic of conversation. my sorry old ass likes the way 50lbs feels, and this bow is not lacking in the cast department for shooting my heavy arrows.
after shooting a couple dozen arrows at 10 yards to find the sweet spot on the handle and get over the "pucker factor" this was my first group from 20.

next two from a little under 25

He's retired. I refer to him like we're old friends or something, but I've never met the man. He's actually from Oklahoma, not Tennessee like I thought. He was referred to me by my friend and mentor Dean Torges sometime before his passing back in 2015 0r 2016. I remember Albert contacting me about making him a bow back then, but he didn't have the money or I didn't have time or something. hope he likes it. I just now got around to shooting the bow I'm making for myself for the first time. 66" 50lbs @ 28.5", which is 5lbs less than I was planning. also, this is the first bow I've brought to the shooting stage that is backed with an experimental timber bamboo specie called Blue Henon, grown in Mississippi, harvested by a friend of mine who asked me to try it. I really hate it when they come in under weight enough that it matters. 1 or 2 lbs does not really matter much in terms of cast for hunting/shooting at close range. 5lbs does matter. in all actuality, bow weight only matters in terms of being able to shoot desirable weight arrows. in that sense, I make bows for myself to match my arrows, not the other way around, but that is whole other topic of conversation. my sorry old ass likes the way 50lbs feels, and this bow is not lacking in the cast department for shooting my heavy arrows.after shooting a couple dozen arrows at 10 yards to find the sweet spot on the handle and get over the "pucker factor" this was my first group from 20.
next two from a little under 25
- 25,777
- 276
Hot dang! Glad to see that bow coming along! I’m only guessing here but I assume the hard part is done? Glad it shoots well and didn’t turn into a pile of splinters!
yes, the construction/tillering is essentially done. I'll check balance and tiller again now that bow has been shot and allowed to fully relax. on to the finishing after that. I'll probably put horn overlays on the nocks on this one. might sell this one, too. make me another one that is 55lbs. willing to trade as well if anyone is interested.
after shooting the bow I've been working on quite a bit, I'm satisfied with the balance and tiller, and ready to commit to moving forward. next step is adding the horn nock overlays. I guess I consider this the first step in the "finish" work. the physical construction is over now except for the finish sanding.
Aside from looking really cool, horn overlays serve a the functional purpose of being much more durable than even osage and bamboo on the parts of the bow that take the most abuse. horn is very tough material, and won't be damaged beyond cosmetically from being nicked, dented or deeply scratched. it's a bit of work, but pretty well worth in my estimation. first thing I do is square up the sides to the back of the bow. it's hard to tell in pictures, but the belly of my bows is wider than the back. the reason for this is to shift the neutral plane of bending away from the back, toward the belly, to make those normally loafing wood fibers in the "middle" do more work. this can be proven with complicated, exotic math, physics, and structural engineering principals, but the result is that it creates a circumstance where less wood can do more work. It's a very real and measurable improvement to more traditional, less sophisticated, wooden bow designs, but I digress.
square up the sides.

mark some guide lines for the stock I'm going to remove and replace with horn. I devises a marking jig specifically for this purpose. I haven't a clue how other people do this.

I mark both sides with the jig like so.


then carefully remove the stock, keeping it as flat as I can from side to side, end to end with coarse rasp, fine rasp, and finish with a few passes with a toothing iron that has a very, very slightly radiused cutting edge. this is how I make sure the surface to be glued it is flat, and not high in the center from side to side. a sturdy straight edge tells me if there are any high spots from end to end on the glue surface. laying tools on the glue surface and observing where, if any, light is coming through tells me where the high spots are and allow for very precise flattening without minimal risk. yes, I could rig up a way to use my disk/belt sander, but one slip with a power tool and the bow might become firewood. doing by hand is safe, and producing hairline glue joints by hand is a source of pride for anyone glues wood pieces together for whatever reason.
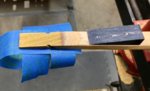
ready for horn and glue.

a very critical eye on the dry fit will produce a thin, reliable glue joint. the tiny furrows created by the toothing iron insure that the glue joint cannot be starved no matter the clamp pressure. I don't use clamps for this, though. the "suck" of the glue and some blue painters tape will do nicely.

I'm waiting on my Urac 185 resin to come up to room temp while I work on this posting. I store it in the fridge so it will last longer. like 10 times longer than room temp. probably time to get out my drug dealer digital scale and weight out some glue parts.
Aside from looking really cool, horn overlays serve a the functional purpose of being much more durable than even osage and bamboo on the parts of the bow that take the most abuse. horn is very tough material, and won't be damaged beyond cosmetically from being nicked, dented or deeply scratched. it's a bit of work, but pretty well worth in my estimation. first thing I do is square up the sides to the back of the bow. it's hard to tell in pictures, but the belly of my bows is wider than the back. the reason for this is to shift the neutral plane of bending away from the back, toward the belly, to make those normally loafing wood fibers in the "middle" do more work. this can be proven with complicated, exotic math, physics, and structural engineering principals, but the result is that it creates a circumstance where less wood can do more work. It's a very real and measurable improvement to more traditional, less sophisticated, wooden bow designs, but I digress.
square up the sides.
mark some guide lines for the stock I'm going to remove and replace with horn. I devises a marking jig specifically for this purpose. I haven't a clue how other people do this.
I mark both sides with the jig like so.
then carefully remove the stock, keeping it as flat as I can from side to side, end to end with coarse rasp, fine rasp, and finish with a few passes with a toothing iron that has a very, very slightly radiused cutting edge. this is how I make sure the surface to be glued it is flat, and not high in the center from side to side. a sturdy straight edge tells me if there are any high spots from end to end on the glue surface. laying tools on the glue surface and observing where, if any, light is coming through tells me where the high spots are and allow for very precise flattening without minimal risk. yes, I could rig up a way to use my disk/belt sander, but one slip with a power tool and the bow might become firewood. doing by hand is safe, and producing hairline glue joints by hand is a source of pride for anyone glues wood pieces together for whatever reason.
ready for horn and glue.
a very critical eye on the dry fit will produce a thin, reliable glue joint. the tiny furrows created by the toothing iron insure that the glue joint cannot be starved no matter the clamp pressure. I don't use clamps for this, though. the "suck" of the glue and some blue painters tape will do nicely.
I'm waiting on my Urac 185 resin to come up to room temp while I work on this posting. I store it in the fridge so it will last longer. like 10 times longer than room temp. probably time to get out my drug dealer digital scale and weight out some glue parts.
Urac 185 is a very powerful two part epoxy. was formerly used commercially to make plywood, LVL, etc. one of the best things about it is its gap filling properties. you can adjust for more or less gap filling by using more or less hardener, but the more hardener you use the shorter the working time. for my bow building purposes I mix 7 parts resin to 1 part catalyst by weight. this produces an open working time of about 30 minutes at 70*. for this job, I use a bit extra hardener as I don't need more than 5 minutes to get everything done after I mix the components. glue gets weighed out in grains. doesn't take much to cover two square inches of glue surface. 70 grains of resin, 15 grains of hardener, which is about two teaspoons and about twice as much as I needed. left over goes to the trash. it's expensive, so I don't like to waste it.

I let the measured parts sit until immediately prior to use. after I weigh the glue, I wipe down the glue surfaces of the horn and bow with acetone to remove any trace of skin oil, sawdust or other contaminant. overkill for this, maybe, but it's important when gluing bamboo backing to osage core.

everything ready to go.

once mixed, this is about the consistency of yellow wood glue. a bit thicker for this application with the extra hardener. once mixed, the clock is ticking.


the initial tack of this type of adhesive if very powerful, which is why you don't need to clamp the piss out of something like this. tape is there to hold it still for a few hours until it hardens. I'll bring it in the house tonight to fully cure and not touch it for 24 hours, or whenever I get around to working on it. now I wait.
I let the measured parts sit until immediately prior to use. after I weigh the glue, I wipe down the glue surfaces of the horn and bow with acetone to remove any trace of skin oil, sawdust or other contaminant. overkill for this, maybe, but it's important when gluing bamboo backing to osage core.
everything ready to go.
once mixed, this is about the consistency of yellow wood glue. a bit thicker for this application with the extra hardener. once mixed, the clock is ticking.
the initial tack of this type of adhesive if very powerful, which is why you don't need to clamp the piss out of something like this. tape is there to hold it still for a few hours until it hardens. I'll bring it in the house tonight to fully cure and not touch it for 24 hours, or whenever I get around to working on it. now I wait.