Welcome to TheOhioOutdoors
Wanting to join the rest of our members? Login or sign up today!
Login / Join

DIY Draw Board.... with PICS

jagermeister

Dignitary Member
Supporting Member
18,296
237
Ohio
When it comes to tuning binary cam bows, or 'slave-cam' bows, a draw board is a very useful tool for checking cam rotation, timing, and sync. Since I own a bow like this, and have been wanting to get into DIY archery tuning, I thought the time was right to build my own draw board.

It's actually a very easy and inexpensive project. A couple hours of your time and about 40 bucks is all you'll need.

Supplies:
1 - 2 x 6 plank (about 6-8 ft long)
1 - trailer/boat winch (found at TSC for $19.99)
1 - 1/2" ID threaded pipe nipple (galvanized or black, doesn't matter)
1 - 1/2" threaded pipe floor base
1 - yard stick (Home Depot has them in the paint section for $0.61 each)
1 - turnbuckle
1 - speed link or heavy duty carabiner
1 - short section of 3/4" ID rubber hose
1 - scrap piece of rubber or felt

The build itself is very simple. I started out by measuring on my bow, how high above the throat of the grip were the berger holes... which was about 2". I did this because I wanted to stagger the pipe on the plank from where the winch pulls back... Because when you draw a bow, you're actually pulling from above the grip throat. I attached the pipe base near one end of the 2x6, centering it 2" from the end. At the opposite end, I mounted the winch in the center of the 2x6, but mounted an eye-bolt as a guide just in front of it 4" from the edge of the board (so 2" above the grip throat). This probably isn’t totally necessary, but I felt it would better imitate a real draw of the bow.

With the pipe and winch mounted, it was time to attach the yard stick. When measuring AMO draw length, it is measured from the throat of the bow grip, plus 1.75". I measured back from the FRONT of the pipe 2” to gain clearance from the pipe base, and then marked a line. I cut the yard stick off at 3.75” (1.75” + the 2” clearance) and attached it to the board, starting at my mark behind the pipe base.

The gap between the pipe and the winch can vary… Obviously it only has to be wide enough to accommodate the draw length of the bow. I made mine extra long, so that eventually I can attach a digital scale behind the turnbuckle.

Finished draw board…


Pipe and base…


The winch setup…


The turnbuckle is used to finish the draw on the bow. You don't want to pull to hard into the back wall with the winch... So you use the winch to get it close to full draw, then spin the turnbuckle to bring it back all the way.


Continued…..
 
Last edited:

jagermeister

Dignitary Member
Supporting Member
18,296
237
Ohio
Here are some pictures showing the draw board in action.


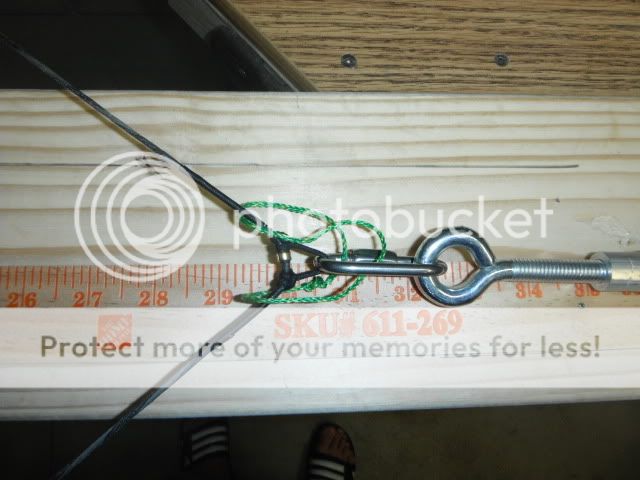
Quick and easy way to measure draw length. Also, notice the green string attached from the speed link around the bow string. This is somewhat of a failsafe… Just in case the d-loop decides to break for some reason.


Checking draw stops….


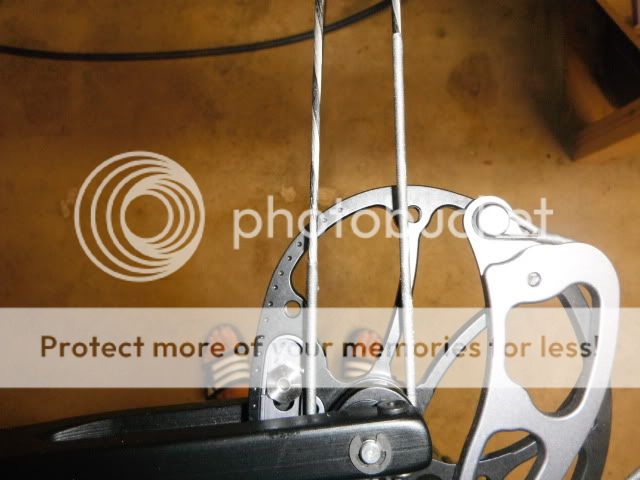
Now here is where the draw board really becomes useful. On these Elite bows, the cams have timing dots on them for use in tuning. In this first picture, the top cam is shown, with the front control cable passing through the THIRD timing dot.


In this second picture, the bottom cam is shown, with the front control cable passing through the SECOND timing dot and slightly across the third.


What this is telling me is that my cams are slightly out of sync. I’m still trying to figure this all out, but I believe (correct me if I’m wrong, Milo) the top cam is slightly under-rotated… and I will need to either advance this cam, or retard the bottom cam to fix this issue. This is accomplished by adding or removing twists in the control cables.


As you can see, this is an easy build and a very useful tool. This type of tuning isn’t for everyone, but for guys that are tired of looking for a good archery tech and want to work on their own bows this is the way to go. Hopefully this DIY thread is helpful for anyone else here that would like to build their own draw board. If you have any questions, ask away!
 
Last edited:

Milo

Tatonka guide.
8,188
171
NICE work jbrown....i'm not gonna comment on the cam rotation because this is the part YOU need to figure out. your gonna learn more screwing it up than me tellin you. get to work and nice job brother. be sure to write down all the changes you make so you can go back and undo if you go the wrong way. Time for a press?
 

jagermeister

Dignitary Member
Supporting Member
18,296
237
Ohio
NICE work jbrown....i'm not gonna comment on the cam rotation because this is the part YOU need to figure out. your gonna learn more screwing it up than me tellin you. get to work and nice job brother. be sure to write down all the changes you make so you can go back and undo if you go the wrong way. Time for a press?

Damn, I had a feeling you were going to tell me that. lmao

I have a press that I made out of a pipe clamp setup (you can see it along the back of my work bench). It's not the best, but it seems to work alright for the things I can do, so far anyway. I picked up a string serving kit yesterday, so I'm going to try my hand at replacing that center serving today as well.
 

Fluteman

Senior Member
Supporting Member
7,096
160
Southeast Ohio
Looks good Jim! I can't tell for sure in the pics, is your string coming off at an angle off the cam? Like maybe the winch needs shimmed up a bit. It kinda looks like it in one of the pics, but again, it is hard to tell.
 
Last edited:

jagermeister

Dignitary Member
Supporting Member
18,296
237
Ohio
Looks good Jim! I can't tell for sure in the pics, is your string coming off at an angle off the cam? Like maybe the winch needs shimmer up a bit. It kinda looks like it in one of the pics, but again, it is hard to tell.

Took me a minute, but I see exactly what you're talking about, Greg. I don't know if that's what was happening, or if it just looked that way due to the angle of the camera. I'll have to check that out when I set it back up later on. Good catch!
 

Fluteman

Senior Member
Supporting Member
7,096
160
Southeast Ohio
Sorry, I'm on my phone and had no way to copy and paste the picture. Just looking out for my peeps, I'd hate to see you derail that string and mess your pretty little bow up!
 

hickslawns

Dignitary Member
Supporting Member
40,411
288
Ohio
I admire you guys that do your own wrenching on your bows. I will work on a house, car, truck, backhoe, tractor, etc. I just don't know enough about bows to do it. I will pay an expert to do mine while I am out working on what I DO know in order to pay them. lol

Maybe someday I will get there. Looks great though Jim!
 

Milo

Tatonka guide.
8,188
171
thats cam lean and it may be also the angle at which your pulling with the winch making it look worse that it is..
 

jagermeister

Dignitary Member
Supporting Member
18,296
237
Ohio
I admire you guys that do your own wrenching on your bows. I will work on a house, car, truck, backhoe, tractor, etc. I just don't know enough about bows to do it. I will pay an expert to do mine while I am out working on what I DO know in order to pay them. lol

Maybe someday I will get there. Looks great though Jim!

Therein lies the problem, Phil. It seems like most of the "experts" out there are fuggin morons these days. It's more trouble than it's worth trying to bounce around from shop to shop, looking for a good tech. IMO the best way to make sure something gets done right is to do it yourself. Hell, look at the trouble Redcloud went through with that so-called expert. Plus, it's just a lot of fun tinkering around with bows man!
 

Milo

Tatonka guide.
8,188
171
i got a text and we have officially popped Jbrowns cherry...he is a bow tuner delux now..Who's next?
 

Milo

Tatonka guide.
8,188
171
get to TSC and pick up the stuff on his list and then he will ship you a CD. gotta give it back though..
 

Curran

Senior Member
Supporting Member
8,045
186
Central Ohio
Very cool JBrown!!! I was just thinking about your bow press plans a few weeks ago. I'd love to get there someday where I'm working on my own equipment. Hell, I just started paper tuning, and back tuning my own bow in the past few years.
 

jagermeister

Dignitary Member
Supporting Member
18,296
237
Ohio
As milo said, my bow tuning cherry has officially been popped! As you can see from the pics above, my top cam was slightly under-rotated at full draw. To correct this, I added 1 1/2 twists to the outer cable on the bottom cam, which basically advanced the travel of the top cam. I know, it sounds confusing... it's easier to explain when looking at the bow. Anyhow, after doing this, both cams are now in perfect sync at full draw. Since it was really just a minor adjustment, my brace height, draw length and ATA all stayed the same.

What really got me to doing this was trouble I was having with a tail-high tear through the paper. Greg, you remember me saying at the BEC shoot that my arrows didn't look to be flying true? Well, they weren't. I messed around for a few hours one night... adjusting the rest, adjusting the nock, etc... All the while not doing anything to get rid of the tail-high tear. Milo suggested that I may have had some string stretch and that my cams may be off. So off to TSC I went and began the build of the draw board. Upon completion, it was confirmed that the cams were out of sync. I can tell you now, after getting the cams back in sync, I no longer have the tail-high paper tear. My arrow is running through the center of the berger holes and nock is 90-degrees to the string.

I'm still getting a slight tail-right paper tear, but that has been the case ever since I bought the bow. I just can't seem to get a comfortable, torque-free grip with this bow. However I have learned that paper tuning will make you pull your hair out if you let it. I'll be doing another walk-back tune here in the next few days, and that should get my BHs flying right with the field tips.

Thanks again for the help, Milo. You're the man. Greg, let me know where to mail this DVD to when you're ready... This thing is worth its weight in gold.
 

Milo

Tatonka guide.
8,188
171
You are welcome and you will get addicted to this stuff now. if you dont end up getting rid of that right tear, call me and i will send you something to try. i have been wanting to put it on my bow but just have not. it may help. i think if you really work on that grip you can get rid of it but you never know sometimes. also send me your email and i will forward you a better bow press to consider when your ready. fairly inexpensive tooo boot
 
I feel the design of the Z28 an other Elite made bows grips can make for a love or hate relationship.I have an do struggle with it at time..My buddy couldn't take it any more an got a aftermarket Torque-less grip for his GT500 .So that maybe a option there not to pricey if i remember right.There is a sticky thread on the Elite archery forum in the Tech section that has pics of how to apply a torque free hand placement with these grips..Its works I can say that!! Just a thought they an maybe it will help